Adding extensions to sketchup
Содержание:
- Первый запуск Скетчап
- Touring the SketchUp for Web interface
- Managing trust and signatures
- Sequencing scene tabs
- Managing properties saved with a scene
- Revision History
- Setting preferences to customize your workspace
- Saving files
- Installing extensions manually in SketchUp
- Пропорциональное масштабирование выборки
- PLUGIN: Does anybody want to play with Matchbox cars?
- Авторизация SketchUp в сети на правах администратора
- How to Install Sketchup Plugins
- Updating extensions
Первый запуск Скетчап
Поставляется приложение Гугл Скетчап на русском, поэтому русификатор скачивать не придется. На данном этапе нас интересует сам редактор, то есть приложение SketchUp Pro, а не два других его компонента. Поэтому запускать нужно именно его.
При первом запуске появится окно приветствия с тремя основными вкладками:
- Изучение. Для работы с онлайн сервисами для знакомства с приложением. Необходимо подключение к интернету.
- Лицензия. Здесь можно посмотреть данные о лицензии, при необходимости отредактировать или удалить эту информацию.
- Шаблон. Выбрать подходящий для моделирования шаблон. Например, для разработки предварительных проектов или городского планирования. Нужны для задания единиц измерения и вида модели. Вы всегда сможете его изменить по ходу работы. Библиотека программы включается в себя более 20 доступных для выбора шаблонов.
Определившись с начальными настройками, можно приступать к работе с программой. Для этого нажмите кнопку «Начать использование SketchUp». После этого появится окно с рабочим пространством.
Справка: чтобы отключить экран приветствия, снимите галочку напротив «Всегда показывать при запуске».
Touring the SketchUp for Web interface
SketchUp for Web looks and works a lot like SketchUp, but the web- and desktop-based programs have fairly different interfaces. Whether you’re totally new to creating 3D models or an experienced SketchUp user who’s trying SketchUp for Web for the first time, this section can help you find your way around the SketchUp for Webinterface.
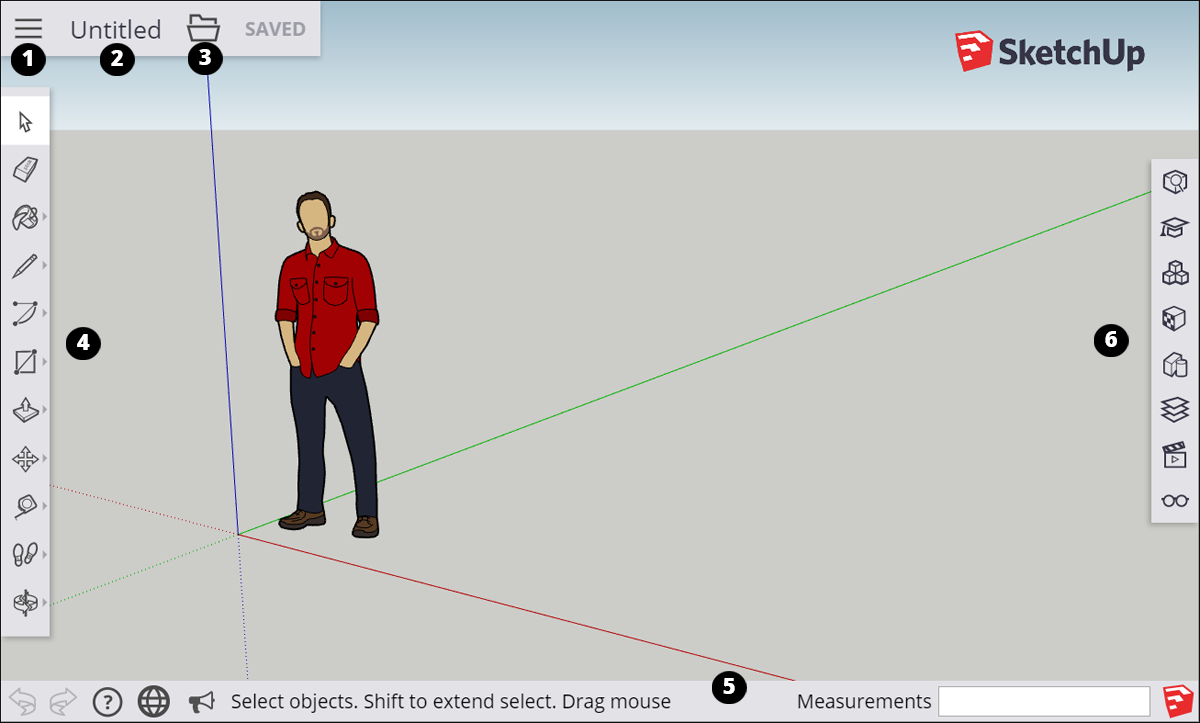
In the following figure, you see how SketchUp for Web looks when you first open the program in your web browser. The callouts in the figure correspond to the numbers in the following list:
- Open/Model Preferences icon: When you click this icon in the upper-left, a sidebar opens where you find an About SketchUp section, your account info, templates for creating new models, your saved in Trimble Connect, a geolocation tool, the Model Info panel, and a link to upload your model to 3D Warehouse.
- Model name: Click Untitled to save your model to Trimble Connect.
- File Operations icon: Click this icon to download the open a new or existing model or save your model as a new file. You also find options for inserting , , or files or downloading your model as an or file.
- Toolbar: This toolbar contains the tools you need to create 3D models. For the most part, these tools work just like their counterparts in the desktop version of SketchUp. In SketchUp for Web, some tools have a flyout menu that holds additional tools. For details about the toolbar and links for more information about using each tool, see Creating and Editing Models.
- Status bar: From left to right, you find the Undo/Redo buttons, a link to the Help Center, a language menu, a link to the SketchUp Forums, tips and options for the selected tool, and the Measurements box for modeling accurately.
- Panels: Click these icons to access panels for entity info, the Instructor, components, materials, styles, layers, views, and display. For details about these panels and links to more information about each one, see Creating and Editing Models.
Tip: If you’re not certain what a tool is, hover over the tool and a ScreenTip appears. When you select a tool, a brief note about what it does or the options available for that tool appear in the status bar. You can also find help by opening the Instructor panel.
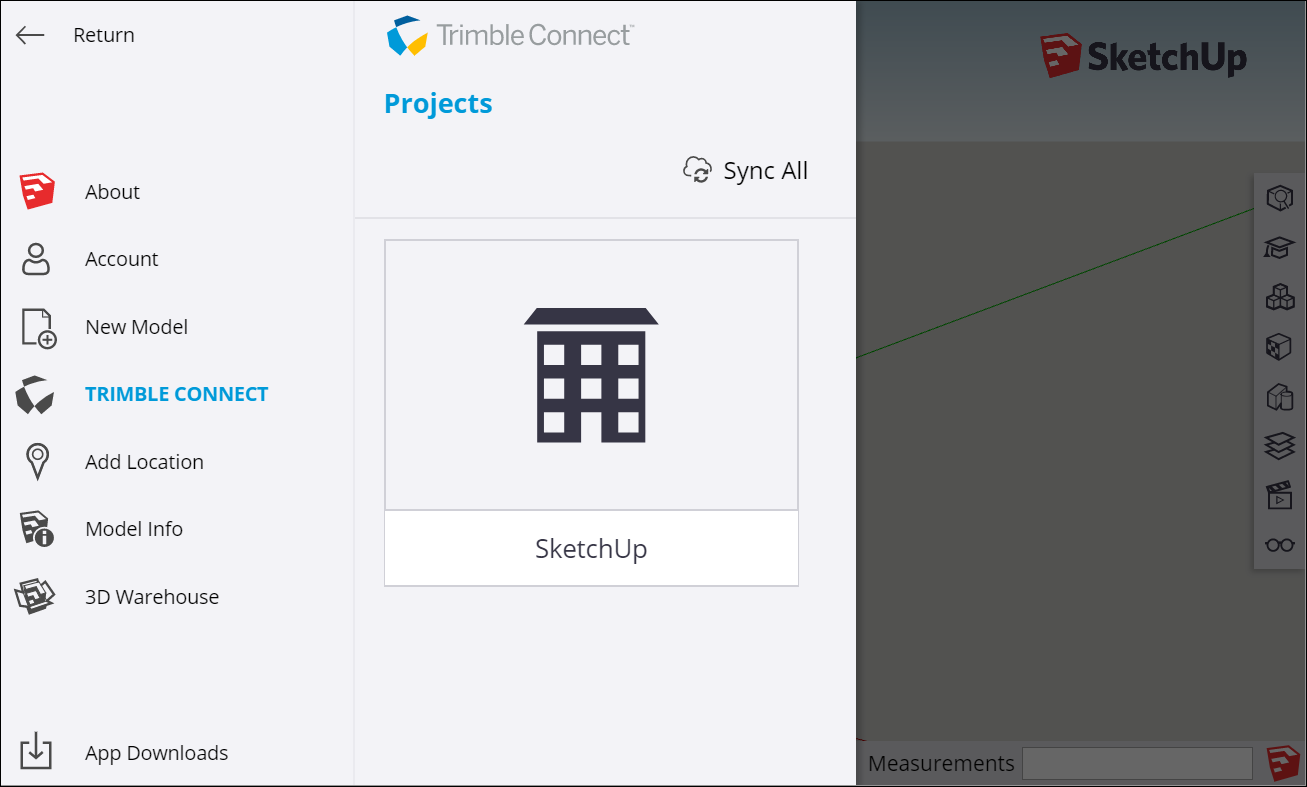
On the SketchUp for Web sidebar, shown in the following figure, you can click an icon on the left to view different panels. Here’s a quick introduction to each panel:
- About: Click the About icon () to learn about the latest updates to SketchUp for Web and review the Terms of Service.
- Account: Click the Account icon (), and you see what user account you’ve used to sign in and enables you to sign out of SketchUp for Web.
- New Model: Click the New Model icon () to select from a limited number of templates for creating a new model.
- Trimble Connect: If you have models saved to Trimble Connect, you find them by clicking this icon ().
- Add Location: Click the Add Location icon (), and you see a map for geolocating the open model.
- Model Info: Click Model Info () to set a model’s units of length. You can select the format (inches or millimeters) and the level of precision.
- 3D Warehouse: Click the 3D Warehouse icon ()to upload your model to SketchUp’s 3D Warehouse.
Managing trust and signatures
Starting with SketchUp 2016, registered extension developers can claim their software by signing it digitally. This signature says, “I made this,” but in a secure coded format. In other words, when an extension is signed, the extension file contains a signature file that is securely tied to the developer’s Extension Warehouse account. An extension may be unsigned if you installed it manually.
Tip: Download the most recent version of any extension you use from the Extension Warehouse, the author, or the original trusted download source. You might contact the author of any extensions that are not digitally signed and ask them to look into this new feature.
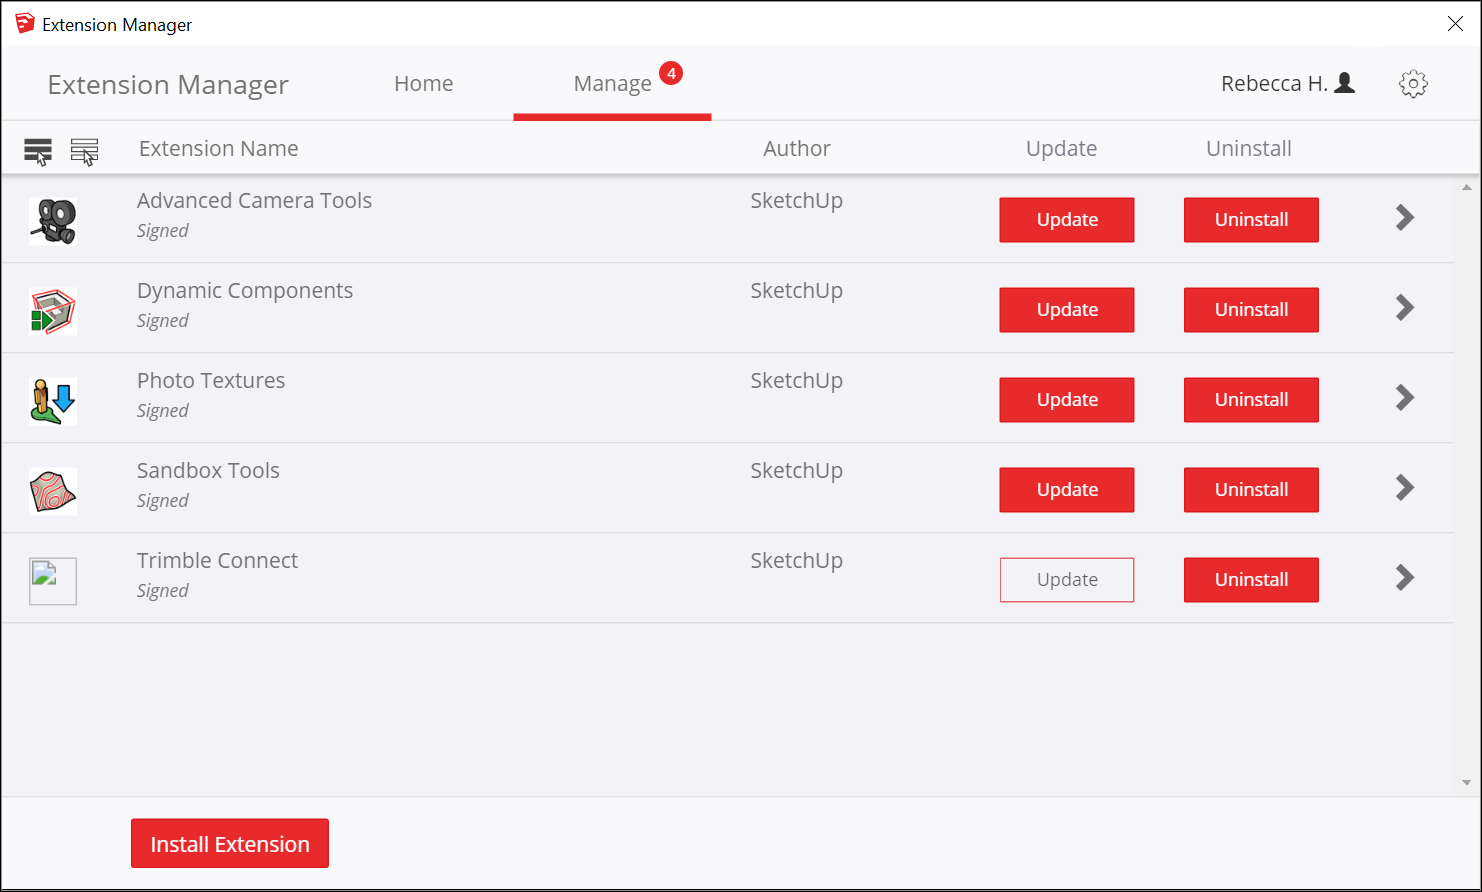
The Extension Manager enables you to see whether an extension is signed. If you have an unsigned extension, you can tell SketchUp whether you trust the file, which determines whether the extension can be enabled at startup. Follow these steps:
- Select Extensions > Extension Manager. The Extension Manager window appears.
- In the Extension Name column, you see whether an extension is signed. Click the right-pointing arrow to see an extension’s details, and you can view the extension’s signature information and designate an unsigned signature as trusted.
Sequencing scene tabs
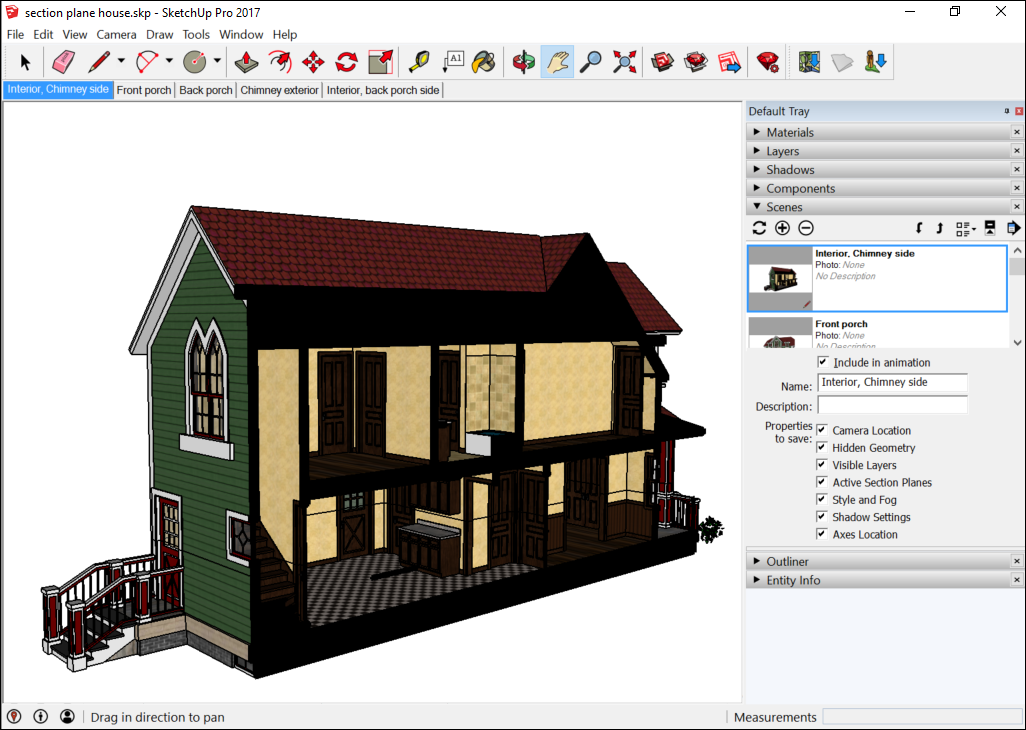
SketchUp adds scene tabs and lists of scenes in the Scenes dialog based on the order in which you create the scenes. However, this order may not be what works best. For example, in the following figure, say you want to move the interior scene later in the sequence, after all the exterior scenes.
To change the sequence of your scenes, you use either the scene tab’s context menu or the Scenes dialog:
- Scene tab context menu: Context-click the tab you want to move and select Move Left or Move Right. Repeat the command if you want to move the scene more than one position in the tab order.
- Scenes dialog: Select the scene from the list and click the Move Scene Down icon () or the Move Scene Up icon () in the upper right. The tab order updates to reflect the order in the Scenes dialog.
Managing properties saved with a scene
By default, when you add a scene, SketchUp saves several properties that affect the view of your model. In the Scenes dialog, the following checkboxes enable you to control which of these properties are saved. Here’s brief introduction to the checkboxes and the properties they control:
- Camera Location: Remember that SketchUp uses a camera as a metaphor for the way you view your model. The camera properties saved with a scene include the the point of view, including the zoom distance and field of view.
- Hidden Geometry: If your scene has hidden geometry, this geometry remains hidden every time you load that particular scene.
- Visible Layers: This property applies if you use layers to control visibility.
-
Active Section Planes: Your model can contain several section planes, which slice your model at a certain point to display a view of the inside, usually from the top or the side.
Tip: You can use different section cuts in successive scenes to create exciting animations of your model.
- Style and Fog: This checkbox determines whether the scene saves style settings, such as edge rendering and fog.
- Shadows Settings: This checkbox tells SketchUp whether to store all shadow-related information, including type, time, date, and so on, with the scene.
- Axes Location: This setting affects whether the axes display and the axes’ position in the scene.
By default, all these checkboxes are selected, so all the properties are saved with your scene. If you don’t want to save one of these properties, select the scene in the Scenes dialog, click the Show Details icon () to display the checkboxes, and deselect the checkbox for each set of properties that you don’t want to save.
Note that you can’t save updates to a property with a scene if that property isn’t saved with the scene. See the next section for details about making sure you include all the properties you want to save in an update.
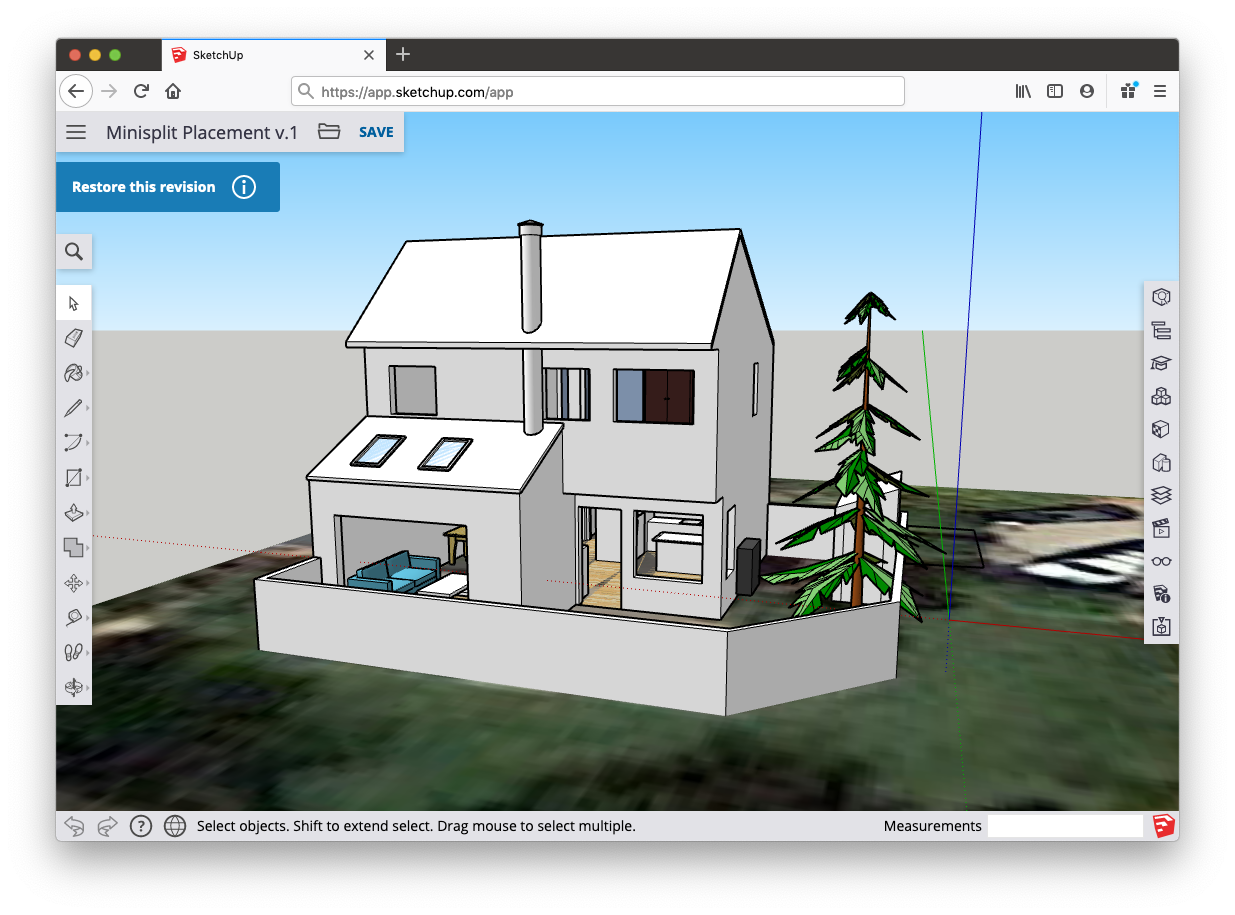
Revision History
Every time you save a model — and every time SketchUp for Web auto-saves — a new version of your model called a revision, is sent to Trimble Connect. So in effect, there is a back-up file that you can always restore. This is very helpful if your model becomes corrupted, if you add geometry or components that make your model difficult to operate, or if you want to revert back to an earlier, simpler version of your model. Here’s how it works:
To access revision history for a model, navigate to that model in either the Home tab (if it’s a recently accessed file) or in Trimble Connect. Open the file options menu (the three-dot icon) and click ‘History’. This will reveal a list of revisions for your file on the right side of your screen.
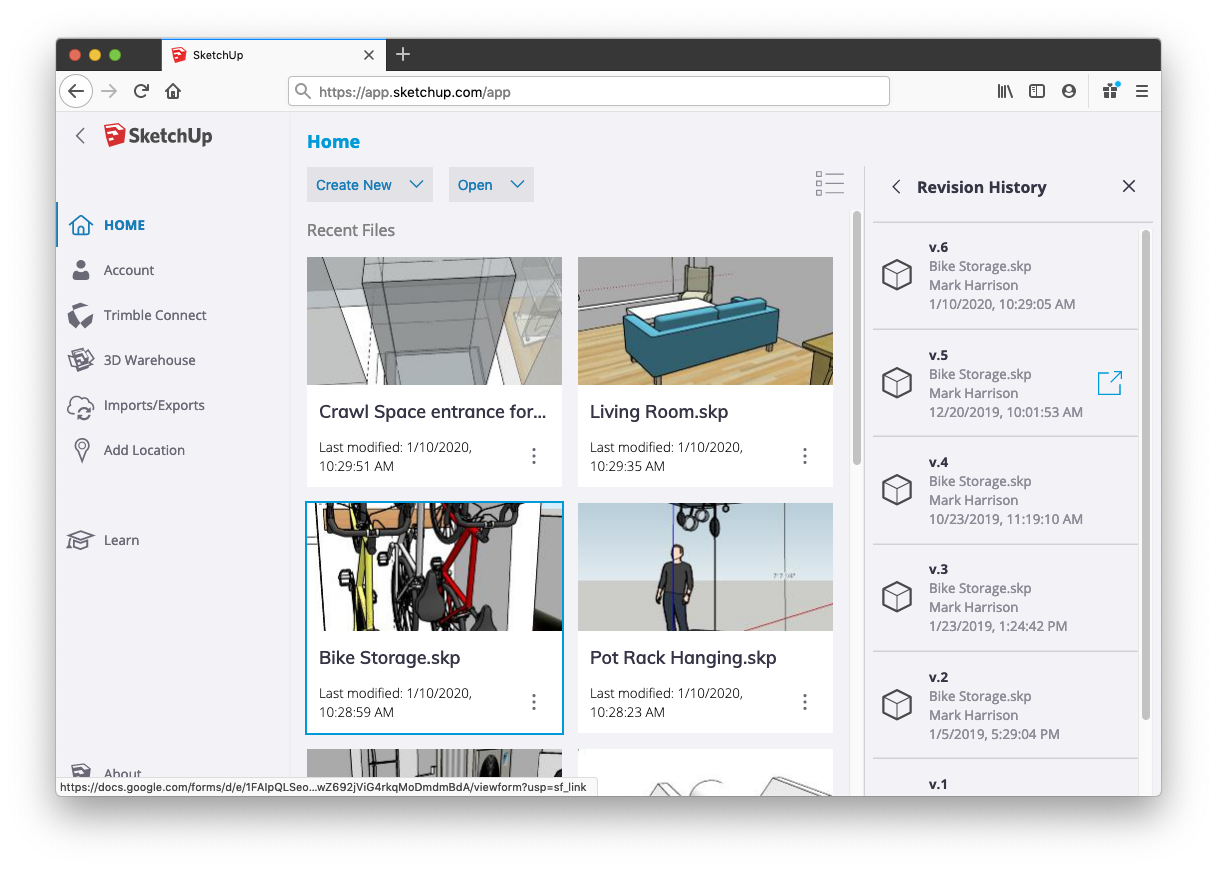
When you mouseover a certain revision in the list, you’ll see an action button: Open revision.
If you choose to open a revision, this older version of your file will load into the modeler. In this state, any changes you make in this older version will be temporary until you choose to save your progress. When you are reviewing a revision, you can choose to save your revision as a copy of the original model (with a different name) by using the Save or Save As commands.
Tip: If you choose the same name as the original file, you will be effectively restoring your revision. Your model will retain its full revision history, including the last saved version before you clicked save.
You can also choose to restore a revision using the Restore command in the blue status flag that displays on the left-hand side of the modeling window.
Setting preferences to customize your workspace
In SketchUp, preferences options enable you to customize your workspace.
To access these preferences, select Window > Preferences (Microsoft Windows) or SketchUp > Preferences (Mac OS X) from the menu bar. In the sidebar on the left, select the preference panel that you need.
The following table outlines how you can customize the workspace and what preference panel enables you to make a change.
Tip: SketchUp extensions, also called plug-ins, enable you to add specialized tools and features to SketchUp. To customize your workspace with extensions or manage you extensions preferences, log into the Extension Warehouse and use the extensions management features. See the Extension Warehouse section of the Help Center for details.
| To Do This | Open this Preference Panel | Good to Know |
|---|---|---|
| Set the default image editor. | Applications | Determines what image editor opens when you want to edit a texture in an external editor. Click Choose and select an application on your operating system. |
| Display crosshairs on your cursor that correspond to axes colors. | Drawing | Select the Display Crosshairs checkbox in the Miscellaneous area. |
| Activate the Paint Bucket tool after you click a material swatch (Mac OS X only). | Drawing | This checkbox is enabled by default. Deselect Auto-activate Paint Tool to disable it. |
| Toggle the Push/Pull tool’s pre-pick feature. | Drawing | Pre-pick is enabled by default so that you can select a face, orbit, and push/pull the face even when the selected face doesn’t appear in the current view. Select Disable Pre-pick on Push/Pull Tool to disable the feature. |
| Display a component bounding box and its edges in different colors. | Compatibility | This feature is disabled by default. Select the Bounding Box Only checkbox, and a component’s edges appear in a different color from the component box when you select the component. |
| Change the size of the toolbar buttons. | Workspace | The large buttons are enabled by default because they’re easier to see and use. For smaller buttons and a larger drawing area, deselect the Use Large Tool Buttons checkbox. |
| Select whether windows cascade and the default window size (Mac OS X only). | Workspace | On a Mac, windows cascade by default. Deselect Cascade Main Windows to turn off cascading. Click the Save Current Window Size button to make the size of the active window your default window size in SketchUp. |
| See the toolbars and panel trays after closing them. | Workspace | Click the Reset Workspace button and your toolbars and panels instantly reappear in the most recent docked position . |
Saving files
After you’ve created a new model, one of the first things you may want to do is save it to Trimble Connect. Follow these steps:
- After creating a new model, click either the ‘Untitled’ file name or the ‘Save’ command in the upper left of your screen. In either case, a Trimble Connect dialog will open.
- In the Trimble Connect dialog, first, choose a Project to save your model in. With a Free subscription, you have access to one project, simply called ‘SketchUp.’ With paid subscriptions, you can create more projects at web.connect.trimble.com. Within a project, you can click the “Add folder” button to organize your work within a project.
- When you’ve picked a location in Trimble Connect, click the Save Here button.
Now, as you continue modeling, SketchUp for Web will auto-save your model every few minutes. You can also trigger a manual save by clicking the Save command in the top left of your screen. It’s always a good idea to do a manual save before closing SketchUp.
A Free subscription includes access to both SketchUp for Web and Trimble Connect Personal, a free service that provides you with one project folder, 10 GB of file storage to put in that project, and the ability to invite up to 5 people to collaborate in your project. Paid SketchUp subscribers are upgraded to Trimble Connect Business which offers unlimited storage, projects, and collaborators.
Installing extensions manually in SketchUp
If you download an extension from the Extension Warehouse via a web browser or from a developer’s website, your extension is packaged as an file that you can install manually. Here are the steps you need to follow:
- In SketchUp, select Extensions > Extension Manager. The Extension Manager window appears.
- Click the Install Extension button.
- In the Open dialog box that appears, navigate to the file saved to your computer, select the file, and click OK (Microsoft Windows) or Open (Mac OS X).
- When SketchUp warns you about installing only extensions from trusted sources, click Yes to proceed and install your extension. (This assumes you do, in fact, trust the source of your extension.)
Пропорциональное масштабирование выборки
Если вы хотите изменить размер геометрии в модели и сохранить ее пропорции, вы можете использовать инструмент «Рулетка» или инструмент «Масштаб». Выбор зависит от того, как вы хотите установить масштаб:
- Чтобы масштабировать размер определенной линии, используйте рулетку. Например, вы обнаружите, что одна комната на плане этажа может иметь ширину не более 10 футов, но остальная часть плана этажа может оставаться такой же. Или вы знаете, что статуя должна быть 3 метра в высоту.
- Чтобы изменить размер выделенной области в процентах от исходного размера, используйте инструмент «Масштаб». Например, выберите этот метод, если вы хотите увеличить размер выборки на 200% или уменьшить его до 50%.
Чтобы масштабировать часть вашей модели с помощью рулетки, выполните следующие действия:
- С помощью инструмента Выбрать () выберите объекты, которые нужно масштабировать.
- Щелкните выборку и в появившемся контекстном меню выберите Создать группу.
- Дважды щелкните группу. Вокруг группы появится рамка из пунктирных линий, указывающая, что вы открыли группу, как показано на рисунке.
- Выберите инструмент Рулетка () или нажмите клавишу T.
- Щелкните одну конечную точку контрольной линии. Используйте механизм вывода SketchUp, чтобы выбрать точную конечную точку.
- Щелкните другую конечную точку контрольной линии. Текущее расстояние отображается в поле «Измерения», как показано на рисунке. В этом примере, скажем, вам нужно уменьшить эту ширину до 10 футов из-за проблем на участке, где будет построен план этажа.
- Введите новый размер линии (в этом примере вы вводите 10′) и нажмите клавишу Enter. Этот размер будет использоваться в качестве основы для пропорционального масштабирования вашей модели. SketchUp спросит, хотите ли вы изменить размер группы или компонента.
- Нажмите кнопку Да, и ваша выборка изменится пропорционально. Посмотрите результат на следующем рисунке. Это комната намного меньше.
Примечание. Этот процесс также работает с компонентами. См. Добавление готовых компонентов и динамических компонентов для ознакомления с компонентами. В разделе далее в этой статье объясняется, как масштабирование влияет только на один компонент или все экземпляры компонентов в модели.
Если вы хотите пропорционально масштабировать модель в процентах, инструмент «Масштаб» легко справится с этой задачей. Представьте, что вы не знаете, как поговорить со своим клиентом об уменьшении комнаты на его плане этажа до 10 футов шириной, поэтому вы моделируете слона в комнате, пока обдумываете это. Вот как масштабировать слона или любую другую выборку в вашей модели в процентах:
- С помощью инструмента Выбрать () выберите геометрию, которую нужно масштабировать. Этот шаг важен, если вы хотите масштабировать сложную 3D-выборку. Если у вас простая выборка, например 2D-фигура или объект поверхности, вы можете пропустить этот шаг.
- Выберите инструмент Масштаб () или нажмите клавишу S. Вокруг вашего выбора появится желтая рамка с зелеными ручками, как показано на рисунке. Если вы пропустили шаг 1, щелкните геометрию курсором инструмента «Масштаб».
- Для равномерного масштабирования или сохранения пропорций выборки щелкните угловую ручку масштабирования. Выбранная ручка и противоположная ручка масштабирования становятся красными, как показано на следующем рисунке, а в поле «Измерения» вы видите масштаб 1.00, что означает, что ваша геометрия имеет исходный размер или масштабируется до 100%.
- Переместите курсор, чтобы масштабировать объект. В поле «Измерения» масштаб отображается динамически. Чтобы начать все заново, в любой момент нажмите клавишу Esc. Чтобы установить масштаб из центра, а не из противоположного угла, удерживайте клавишу Ctrl (Windows) или клавишу Option (macOS), перемещая красную ручку угла.
-
Щелкните, чтобы установить новый масштаб вашей выборки. Или введите желаемые размеры шкалы и нажмите Enter.
Примечание. Технически на шаге 5 вы можете ввести размер, например 2 м или 3″, вместо размера в масштабе. Однако масштабирование на основе измерения с помощью рулетки, как правило, более интуитивно понятно.
PLUGIN: Does anybody want to play with Matchbox cars?
2
10
2008
 Introducing the latest version (1.1) of the highly original and fun to play with plugin Matchbox. The Matchbox plugin generates car bodies and can automatically evolve them into various iterations based on your selections. How kewl is that?!?! 8) Thanks goes out to antantantant at Sketchucation for this great Skethcup plugin!
The plugin is easy to use although documentation is sparse and is sorely welcome. I did find that if you have Matchbox installed along with Lightup (in-Sketchup lighting plugin) or Fredo6’s Tools on Surface x 1.3plugin, then neither of these two plugins will work. Don’t let that prevent you from trying out this addictive plugin. Watchout Detroit! There’s a whole new breed of automaker in town!
Technorati Tags: , , , , , , , , , ,
Comments : Tags: 3d design, 3d plugin, 3d rendering, car plugin, free plugin, free sketchup plugin, generate cars, sketchup, sketchup addon, sketchup car, sketchup plugin
Авторизация SketchUp в сети на правах администратора
Если вы приобрели подписку на SketchUp, ваша авторизация регулируется вашей подпиской и входом с помощью идентификатора Trimble ID. После выполнения входа на рабочий стол SketchUp с помощью идентификатора Trimble ID программное обеспечение будет активировано для использования в течение срока действия активной подписки.
Процедура авторизации сетевой лицензии в macOS идентична процедуре авторизации лицензии на одного пользователя.
Если вы распространяете SketchUp по более крупной сети, рекомендуется использовать пакет для создания образов дисков, например Norton Ghost или Deep Freeze. После установки SketchUp на всех клиентских компьютерах можно упростить процесс лицензирования, включив файл, который предварительно заполнит серийный номер и код авторизации вместо пользователей, чтобы им не пришлось вводить его самостоятельно.
Как выполняется эта процедура:
- Убедитесь, что SketchUp Pro 2015 установлен на всех компьютерах.
- Убедитесь, что SketchUp Pro 2016 установлен на всех компьютерах.
- Убедитесь, что SketchUp Pro 2017 установлен на всех компьютерах.
- Убедитесь, что SketchUp Pro 2018 установлен на всех компьютерах.
- Убедитесь, что SketchUp Pro 2019 установлен на всех компьютерах.
- Создайте файл с именем
-
Добавьте в этот файл серийный номер своей сетевой лицензии и код авторизации в следующем формате:
- Сохраните файл и поместите его в следующую папку на каждом компьютере:
Windows: C:\ProgramData\SketchUp\SketchUp 2015OS X: /Library/Application Support/SketchUp 2015
Windows: C:\ProgramData\SketchUp\SketchUp 2016
OS X: /Library/Application Support/SketchUp 2016Windows: C:\ProgramData\SketchUp\SketchUp 2017OS X: /Library/Application Support/SketchUp 2017
Windows: C:\ProgramData\SketchUp\SketchUp 2018
OS X: /Library/Application Support/SketchUp 2018Windows: C:\ProgramData\SketchUp\SketchUp 2019
OS X: /Library/Application Support/SketchUp 2019 - Запустите SketchUp на каждом компьютере или попросите пользователей открыть SketchUp Pro.
- Щелкните вкладку Лицензия в диалоговом окне приветствия «Добро пожаловать в SketchUp». Полях серийного номера и кода авторизации должны уже быть заполненными, чтобы пользователю не пришлось ничего вводить.
- Чтобы завершить операцию при запуске, пользователю необходимо щелкнуть кнопку Добавить лицензию.
How to Install Sketchup Plugins
- Once you’ve downloaded a .rb file from the interwebs save it to where sketchup can find it. By default that location is your Sketchup/Tools folder. In older versions of sketchup you’ll need to use your Sketchup/Plugins folder.
- After your file is in that folder, close and restart Sketchup.
- When you reopen sketchup your plugin will initialize. Depending on the plugin, using it’s functions may vary. Consult the author if you have trouble finding out how to use your plugin. A couple common places it might show up is in the new ‘Plugin’ tab at the top of your program or in the menu you get from r-clicking on objects.
Updating extensions
A developer might update an extension to add a feature, fix a bug, or make an older version of an extension compatible with Ruby 3.0.
To update extensions in the Extension Warehouse, follow these steps:
- In SketchUp, select Extensions > Extension Warehouse and sign in to the Extension Warehouse.
- Select My Extensions from the user menu. The Extension Warehouse opens to the My Extensions tab shown in the following figure. This tab shows all the extensions you’ve installed through the Extension Warehouse. (If you installed an extension manually from another source, that extension won’t appear here. See Adding Extensions to SketchUp for details about manual installation through SketchUp Preferences.)
- To update all your extensions at once, click Update All at the top right of the My Extensions tab. To update a specific extension, click the Update option to the right of the extension’s name.

If you install an extension through the Extension Warehouse (rather than manually), the Extension Manager knows when an extension update is available.
When an extension has an update, a couple of alerts let you know:
- A message appears on-screen.
- A little red circle appears next to the Manage tab, as shown in the following figure. The number in the circle reflects the number of updates.
To update an extension in the Extension Manager, follow these steps:
- In SketchUp, select Extensions > Extension Manager. The Extension Manager window appears.
- Click the Manage tab at the top.
- Click the Update button next to the extension that you want to update. Or to install all the updates at once, select the extensions you want to update and click the Update option that appears at the very top of the column.